Create auto-email rules
Emails can be set up to send automatically from many entities in Footprint Portal, for example, Orders and Invoices. Sent emails can be viewed and re-sent as needed from the Requests list.
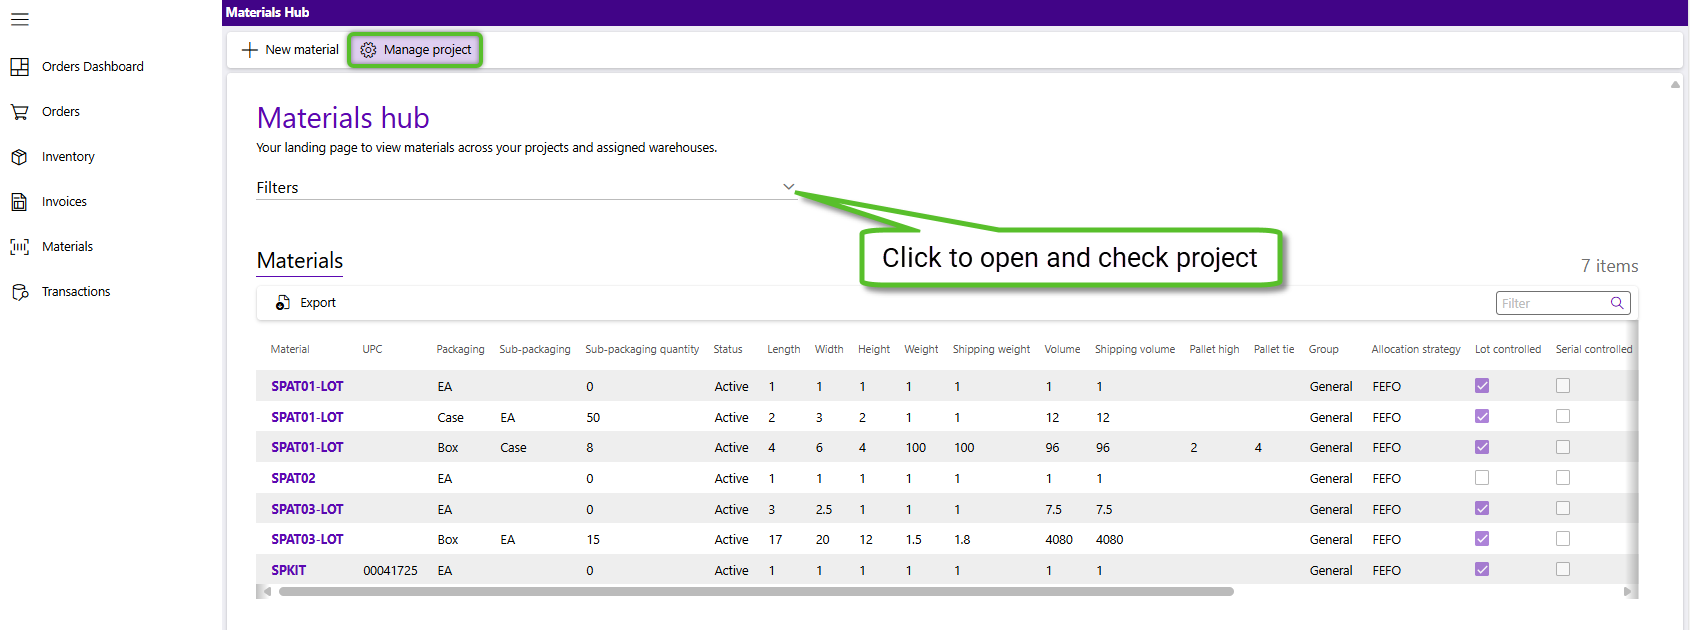
1. From the Materials hub, click the down arrow to the right of the Filters header to open the section and ensure the Project is set to the project you wish to manage contacts for. Then click the Manage project button.
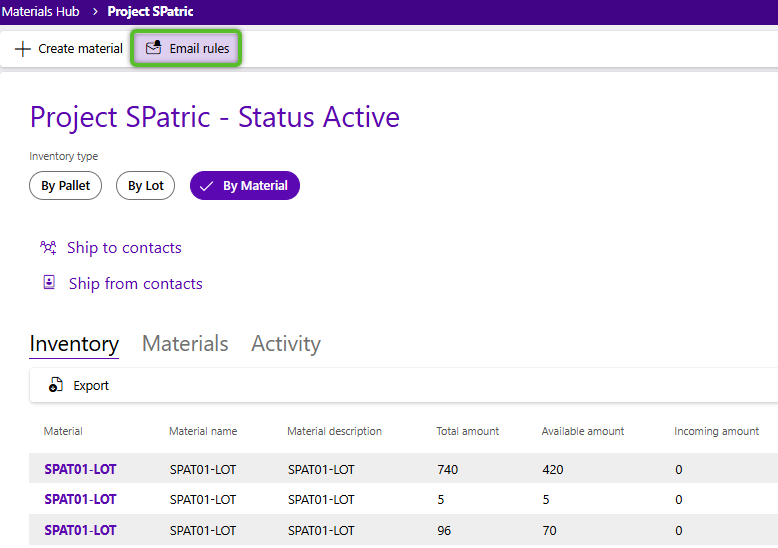
1. Click Email rules button in the project record toolbar to open the project's auto-email rules page.
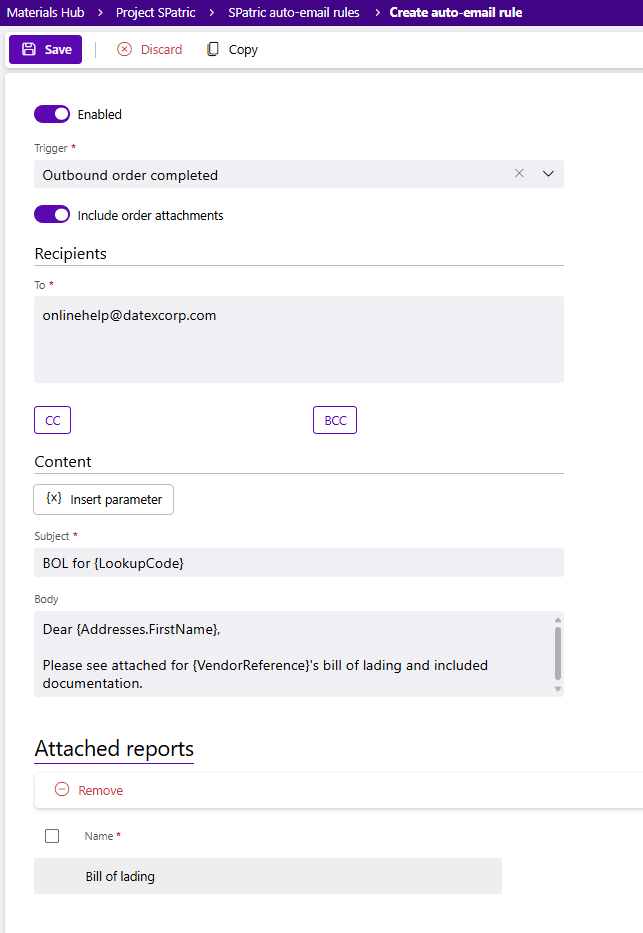
2. Click + New rule button in the toolbar.

Tip
If you already have rules created, to save time, select the Rule and click Copy, then update the record to your purposes as needed.
![]()
2. In the Email Rules window, the Enabled toggle will default to on. This is the setting that turns the rule on. If you don't want the rule to be activated, you may toggle the Enabled button off to be manually turned on later.
3. Select the Auto-Email Rule Trigger. In most cases this will be the action that sets off the email, such as the closing of an outbound shipping order. It also determines what kind of report can be attached to that email. The outbound shipping order, for example, can have the order's bill of lading sent. Please see below for the different trigger types and any additional options they may have.
- Dock appointment completed - Email with selected report(s) will be sent when a dock appointment for this project is completed. This can be further refined to only apply to specific carriers or dock appointment types. You may optionally include any attachments added to the dock appointment to the email with the selected report(s).
- Inbound order completed - Email with the selected report(s) will be sent when an inbound (receiving) order for this project is completed. You may optionally include any attachments added to the order to the email with the selected report(s).
- Invoice exported - Email with the selected report(s) will be sent when an invoice for this project is completed. You may optionally include any attachments added to the invoice to the email with the selected report.
- Lot expiration - Email with selected report(s) will send at the set number of day(s) before the expiration of a lot for this project.
- Minimum inventory threshold - Email with selected report(s) will send when inventory for materials in a selected warehouse drop below the set minimum amount.
- Outbound order completed - Email with the selected report(s) will be sent when an outbound (shipping) order for this project is completed. You may optionally include any attachments added to the order to the email with the selected report(s).
- Schedule - Email with report(s) will send at a set recurring time of your choosing. Options include daily, weekly, or monthly.
4. Set any trigger specific options. Depending on the selection they may be required, such as when you're setting the time for a "Schedule" trigger, or optional such as when you're opting to include attachments for a "Outbound order completed" trigger.
5. Enter the recipient's email address in the To field. While a check will occur that the email address entered has all the components that make it a valid email address, it is not checking whether or not it's an accurate email address.
Multiple email addresses can be entered, separated by a comma or semi-colon.
6. (Optional) If needed, you may click the CC or BCC buttons to open fields for adding email addresses to be carbon copied or blind carbon copied.
7. In the Content section, a Subject much be provided for the email. The Body for the email is optional. For either field parameters may be added using the Insert parameters button. These are fields that can be added that will utilize data the associated entity. For example, the Lookup parameter for an Order trigger will use that Order's lookup code.
The Trigger selected in Step 3, above, determines which fields are available to be inserted into the email.
8. In the Attached reports tab, click the green + Add row option to select the report(s) to add to the email. The report can be selected from the Name field. The report name can be updated if you like. Click the checkmark at the end of the row to finalize. Repeat as needed for additional reports. Remember, the available reports are determined by the trigger selected in Step 3
9. Once you are complete, click the Save button to finalize, and then click the "X" button to close the rule.
The Trigger selected in Step 3, above, determines which reports are available to be attached to the email.
| Last Updated: |
| 10/13/2025 |
Copyright © 2026 Datex Corporation